
söndag 17 maj 2015
fredag 15 maj 2015
måndag 11 maj 2015
Polypainting
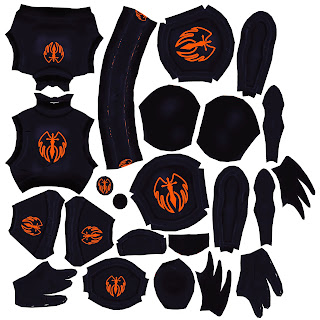
Since the issue of polypaint not being able to be exported resolved I continued painting on the high poly model. Apart from the skin, especially the face that is the most complex part on the model, I have done little more than basic details. I have added light to all edges to make them look worn, and darkened creases.

As we want to create a hand painted look I have basically just blocked out where it should be lighter and darker. I would have done the same in Photoshop before going into details, had I done it all by hand. I think that it does not affect the time very much in any direction. The painting itself does take a bit longer to actually paint because Z-brush does not have as easy and accurate controls as Photoshop has, on the other hand it does give me increased accuracy as i can immediately place the colour shifts exactly where I want them, or as close as Z-brush's controls let me. In Photoshop I would have to estimate, save, check Max to see how it looks, make adjustments, save, look... until it looks right.

My conclusion from this, experiment I guess you can call it since I am trying to find new and improved ways to work, is that it is a fast and easy way to block in details. It is far easier painting on the high poly where you can clearly see all creases and details than it is working on UV templates. Even though it does take slightly longer to actually paint, it is sped up by the fact that you can use a mirrored brush so that you can paint general details on, for instance, two leg guards at once and that you can see exactly where the paint should be placed and how it looks in 3D.
Since I have only used Z-brush a few weeks and tried polypainting in it only two days there are probably many tricks that I don't know about that would give better and more accurate results, for instance sharper details. From what i have experienced so far though, I do not see that it could be an alternative for Photoshop when it comes to cleaning and detail work.

During the first bake the hair was not correctly baked and the high poly of the corset went missing so the Diffuse for the body had to be redone, as it got too late at night we have not been able to rebake at the time of writing this. The eyes, boots and hair decorations also look strange since they were not included on the high poly, they have been painted separately so the two maps will need to be merged. The limitations I discussed are very clear here, in particular the pants, as the paint is very blurry. It is very possible that it is only due to my unfamiliarity with how to use the brushes and program though.
There were also some problems with the armour Diffuse, probably caused in xNormal. The belt is my fault since I was tired and merged the belt buckle to the belt on the high poly, which means the belt buckle was projected onto the belt. This is easily fixed by just painting it over, that area will be covered by the buckle anyway. The orange gaps on some parts, for example the belt, are a bit of a mystery though. If xNormal had problems projecting, or seeing, the edges, they should be white, we have no idea where the orange came from. Apart from that the armour pieces came out beautifully and it is just a matter of getting the details down.

As we want to create a hand painted look I have basically just blocked out where it should be lighter and darker. I would have done the same in Photoshop before going into details, had I done it all by hand. I think that it does not affect the time very much in any direction. The painting itself does take a bit longer to actually paint because Z-brush does not have as easy and accurate controls as Photoshop has, on the other hand it does give me increased accuracy as i can immediately place the colour shifts exactly where I want them, or as close as Z-brush's controls let me. In Photoshop I would have to estimate, save, check Max to see how it looks, make adjustments, save, look... until it looks right.

My conclusion from this, experiment I guess you can call it since I am trying to find new and improved ways to work, is that it is a fast and easy way to block in details. It is far easier painting on the high poly where you can clearly see all creases and details than it is working on UV templates. Even though it does take slightly longer to actually paint, it is sped up by the fact that you can use a mirrored brush so that you can paint general details on, for instance, two leg guards at once and that you can see exactly where the paint should be placed and how it looks in 3D.
Since I have only used Z-brush a few weeks and tried polypainting in it only two days there are probably many tricks that I don't know about that would give better and more accurate results, for instance sharper details. From what i have experienced so far though, I do not see that it could be an alternative for Photoshop when it comes to cleaning and detail work.

During the first bake the hair was not correctly baked and the high poly of the corset went missing so the Diffuse for the body had to be redone, as it got too late at night we have not been able to rebake at the time of writing this. The eyes, boots and hair decorations also look strange since they were not included on the high poly, they have been painted separately so the two maps will need to be merged. The limitations I discussed are very clear here, in particular the pants, as the paint is very blurry. It is very possible that it is only due to my unfamiliarity with how to use the brushes and program though.

There were also some problems with the armour Diffuse, probably caused in xNormal. The belt is my fault since I was tired and merged the belt buckle to the belt on the high poly, which means the belt buckle was projected onto the belt. This is easily fixed by just painting it over, that area will be covered by the buckle anyway. The orange gaps on some parts, for example the belt, are a bit of a mystery though. If xNormal had problems projecting, or seeing, the edges, they should be white, we have no idea where the orange came from. Apart from that the armour pieces came out beautifully and it is just a matter of getting the details down.
söndag 10 maj 2015
Logo
What I have probably spent the most time on this week though is probably the logo, I started with some super fast sketches, just to get some ideas to base it on. After conferring with the teachers and my team I decided upon one design to continue working on one of them. I had a font in mind that we have used so far, after not finding anything better I decided to take it into illustrator and made it thicker and adjusted the size of the first and last letters.
| Original Logo |
| Quick sketches for basic layout |
Since Illustrator is not a friend of mine I decided to take it into Photoshop and continue working on it there. Probably the main change I did was making the serifs pointier and at a better looking angle. I started thinking of how I should go about colouring it to get the style I wanted. One night, inspired by one of my team mates asking me if I would take it into z-brush and do it properly as a joke, I thought of trying to create the letters in max so that I would have a base to work from with straight edges and basic lighting.
| Font exported from Illustrator and fixed in Photoshop |
| Early version of Layout in Photoshop |
Creating the letters went really fast, I started with planes and extruded until I had the basic shapes, then I added loops in the centres so that I would get the effect I wanted (see picture below) and moved them slightly forwards. The final step of the modeling was extruding the edges back so that they got some more depth. I did the same for the frame, I only made a quarter of it and mirrored it twice.
The next step was trickier as I had to figure out how to place the smoothing groups to get the straight edges where I wanted them. The letters that were rounded, O and R, I had to add edge loops around all edges so that I could meshsmooth them as they were looking jagged even with smoothing groups. It was hard to figure out how to place the loops on the complex shapes on the R so that I would keep my hard edges but not get any unwanted ones. In the end it turned out quite good though not perfect.
Had I had more time I would probably have experimented with meshsmoothing all of them and taking them into z-brush as I think I could have added a lot of character to them that fits the art style. It might not be the best way to do it but it would be fun to try it out.
| From the rendering process in Max |
Instead I added a light pointing in the direction I wanted and rendered PNGs of the text, frame and symbol that my team mate created for the main menu book and is seen on Tamarrion's armour. I used them to create colour blocks of the shapes, by doing it this way I managed to get very straight edges which are important in case we would like to print the Logo on a larger surface.
I duplicated the layers and played around with layer modes and a base colour layer to get the general colours and lighting that I wanted. Then I started hand painting in coloured highlights and shadows, making the text and frame more interesting and most importantly, truly visible. When they were very clear I added smaller details in the form of little cuts to give it more character and look more hand-made. This is the part that might have gotten a really good result in z-brush.
| Frame and Font at point of only needing details and polish |
The next step was to fix the background and the symbol so they would be at the same level of polish. This gave me quite a challenge, in the end I added colour to the shadows and highlights of the symbol and used a textured brush on a lighting dodge layer to make the background more interesting. I did not work the symbol any more because I do not want it to steal attention from the name of the game, but also from the time limit.
| Final Logo that was handed in |
If I have time I might continue doing some work on it but I do not see if it will do any good as everything it should be on will already be in print at that time. Also I am not at all happy with the background, I do not think it looks the way I would like and it looks a bit unfinished which I do not like. The text and frame turned out really well though, and most importantly they are very visible even when zoomed out.
lördag 9 maj 2015
So Happy
In my last post I described how we had been unable to find any solutions to baking diffuse maps from Z-brush since the polycount was too high. It turned out that we had been up all night and wasted most of the morning in vain as the polypaint I had created would not be able to be used.
Being the way I am, I refused to accept this.
After two and a half hours of intense googling and experimenting in z-brush I found a possible solution to the problem in xNormal. I tried exporting one of the subtools again and noticed that it said "exporting polypaint" which meant that they would have followed with the .OBJ-file. Apparently xNormal has default settings which ignore per vertex colour, which was exactly what we were trying to export.
As it was impossible to find a clear step by step answer to how to solve this I will try and explain it as best as I can, hopefully it might give someone less of a headache sometime.
I used color to paint the high poly model and then merged together all parts that belonged to the same piece. For example the chest piece has a logo on it which is easier to paint as a separate sub-tool so that the colours do not bleed, but it is easier to manage fewer files, so when I was done I merged them into one sub-tool.
The next step is to simply export the sub-tools one by one as .OBJ-files. The polypaint will automatically follow.
In xNormal you must then uncheck "ignore per vertex color" in two places. One is on the high poly itself in the high poly tab and the other is in the "bake options" tab.


After that it is just a matter of choosing your preferred settings and bake the maps.
I will after all be able to use my five hours of work, I can continue placing basic colours on the high poly so I can see where all details should go and then fix the details in Photoshop and get a hand painted look. It turns out that the only part that was in vain was part of the stress we felt yesterday. From wanting to give up and cry, everything feels so much better now and I am so happy!
Textures and Screenshots
This week has been busier than any week so far, especially us artists have had an insane amount of work to get done and it is not going to slow down before the end of this project. Today we had deadlines for handing in promotional material containing at least a finished Logo, four screenshots and four concept art/dev images as well as playtesting with the other students.
Us artists did not get to the playtesting since we had to work towards our deadline and we had a visitor helping us out with shaders and Unity.
I have been working simultaneously on the texturing of the character and the Logo, but I have also spent time with the other artists going through lighting and the regular giving feedback as well as searching for fonts. I started out the week by doing final touches, UV-mapping the main character and the armour and exporting all parts of the low- and high-polys so that I could send then to my team mate so he could bake normal maps and ambient occlusion.
When the UV-mapping was all done I got started on the diffuse maps, since I have had so much else to do I did not manage to complete them entirely yet. I have blocked in all base colours and started to add details. I quickly noticed how difficult some parts were to paint as I had to figure out how the UV-s translate to the model, the eyebrows is one example of this as she looked very surprised in the first iteration.
I did have the normal map to work from but it did not prove to be perfect, I am thinking that I should probably use the ambient occlusion map to help me out with that. I did come to the conclusion that the tricky parts would be so much easier to just paint on the model, so we went in to Z-brush and managed to figure out how to paint on the model. Late at night we felt it was time to stop and I exported the sub-tools so that my team mate could bake them. It turned out that you cannot do that as the colour did not get exported with the sub-tool.
This meant that the day of the deadline which we had planned to spend on the screen-shots alone, had to be spent trying to get the textures from z-brush and into the game for playtesting and screens. We found a solution which meant that we had to create UVs and textures within z-brush. After three hours of crashing the program and searching Google we found that z-brush cannot create UVs on a model with that much resolution. This was a major set-back as all work spent on painting it has to be done again, without painting on the model making it easier.
I had to give up and hurry to merge the model with the UVs with the one that has been skinned, this meant only copying and pasting the skin layer, so that will need to have a look at. The model was then sent to a second team mate to plot to the placeholder animations before being sent to the coders to put it into the game with the unfinished textures.
The ambient occlusion and normal maps are complete and look beautiful but the diffuse maps still need work and I need to create emissive maps for her runes and eyes. This is what I will be spending my weekend on as I want to be free to work on animations and UI next week.
Both the UI and the menus need new, non programmer-art, graphics and we also need to create particles and fancy effects and feedback.


 |
| Screenshot created by my fellow artists |
Us artists did not get to the playtesting since we had to work towards our deadline and we had a visitor helping us out with shaders and Unity.
I have been working simultaneously on the texturing of the character and the Logo, but I have also spent time with the other artists going through lighting and the regular giving feedback as well as searching for fonts. I started out the week by doing final touches, UV-mapping the main character and the armour and exporting all parts of the low- and high-polys so that I could send then to my team mate so he could bake normal maps and ambient occlusion.
 |
| While UV-mapping the UV checker turned into rainbow war paint |
When the UV-mapping was all done I got started on the diffuse maps, since I have had so much else to do I did not manage to complete them entirely yet. I have blocked in all base colours and started to add details. I quickly noticed how difficult some parts were to paint as I had to figure out how the UV-s translate to the model, the eyebrows is one example of this as she looked very surprised in the first iteration.
I did have the normal map to work from but it did not prove to be perfect, I am thinking that I should probably use the ambient occlusion map to help me out with that. I did come to the conclusion that the tricky parts would be so much easier to just paint on the model, so we went in to Z-brush and managed to figure out how to paint on the model. Late at night we felt it was time to stop and I exported the sub-tools so that my team mate could bake them. It turned out that you cannot do that as the colour did not get exported with the sub-tool.
 |
| From the colouring process in z-brush |
This meant that the day of the deadline which we had planned to spend on the screen-shots alone, had to be spent trying to get the textures from z-brush and into the game for playtesting and screens. We found a solution which meant that we had to create UVs and textures within z-brush. After three hours of crashing the program and searching Google we found that z-brush cannot create UVs on a model with that much resolution. This was a major set-back as all work spent on painting it has to be done again, without painting on the model making it easier.
 |
| Very early iteration of Diffuse maps |
I had to give up and hurry to merge the model with the UVs with the one that has been skinned, this meant only copying and pasting the skin layer, so that will need to have a look at. The model was then sent to a second team mate to plot to the placeholder animations before being sent to the coders to put it into the game with the unfinished textures.
The ambient occlusion and normal maps are complete and look beautiful but the diffuse maps still need work and I need to create emissive maps for her runes and eyes. This is what I will be spending my weekend on as I want to be free to work on animations and UI next week.
Both the UI and the menus need new, non programmer-art, graphics and we also need to create particles and fancy effects and feedback.
söndag 3 maj 2015
Five Weeks Down
This week has gone by super fast and I am still feeling a bit stressed, I think that we will need to kick in an even higher gear next week.
I do have a lot of tasks that demand my attention but I will focus on what I have done for the main character this week. Firstly I needed to make even more changes to the braid after getting feedback from our teachers, which meant redoing the high-poly for it as well. Twice. In the end it turned out well I think, my only concern is that it is so big that it might cover much of the armour on her backside. But the game is all about movement which means that the braid will not be much in the same place and I do feel that it will add a lot to the character. This is how the final high-poly turned out. (Final as in there is no time to fix anything even if we would want to).


When that was done I started working on the highpolys for all of her armour, I have created all of the armour in 3Ds Max as it is easiest to get smooth hard surfaces. The next step will be to take them into Z-brush to just add details that will make it fit into the art style better and look worn. This will be done by treating the edges in the same way as the environment artist has treated the edges of metal objects, meaning I will need to sit down with the artists to discuss exactly what tools he used and put it into the style guide. I will also add cuts in the armour so that it looks as if she has been in fights before, although her armour is still relatively new.

To make the buckles on the leather corset I borrowed a part of the lock mechanism on her book of light which will give cohesion to the style as well as between the character and her book. I also added the logo from the book and placed it upon various places on her armour. The writings on her armour will be completely done in 2D textures instead of engraving them in 3D which would be completely unneccessary. To create a normal map for them with depth, I would only need to make them dark against a light surface and bake normals from that before merging it with the other normal maps.


I do have a lot of tasks that demand my attention but I will focus on what I have done for the main character this week. Firstly I needed to make even more changes to the braid after getting feedback from our teachers, which meant redoing the high-poly for it as well. Twice. In the end it turned out well I think, my only concern is that it is so big that it might cover much of the armour on her backside. But the game is all about movement which means that the braid will not be much in the same place and I do feel that it will add a lot to the character. This is how the final high-poly turned out. (Final as in there is no time to fix anything even if we would want to).
When that was done I started working on the highpolys for all of her armour, I have created all of the armour in 3Ds Max as it is easiest to get smooth hard surfaces. The next step will be to take them into Z-brush to just add details that will make it fit into the art style better and look worn. This will be done by treating the edges in the same way as the environment artist has treated the edges of metal objects, meaning I will need to sit down with the artists to discuss exactly what tools he used and put it into the style guide. I will also add cuts in the armour so that it looks as if she has been in fights before, although her armour is still relatively new.
To make the buckles on the leather corset I borrowed a part of the lock mechanism on her book of light which will give cohesion to the style as well as between the character and her book. I also added the logo from the book and placed it upon various places on her armour. The writings on her armour will be completely done in 2D textures instead of engraving them in 3D which would be completely unneccessary. To create a normal map for them with depth, I would only need to make them dark against a light surface and bake normals from that before merging it with the other normal maps.
Prenumerera på:
Inlägg (Atom)