Visar inlägg med etikett 3D Modeling. Visa alla inlägg

måndag 15 maj 2017

Dagger - Finally Done!


So I finally took the time to complete the dagger I started on a long while back before being interrupted by christmas and the artwar contest among other things. Anyway here it is!


I do think that my colour skills are improving, as well as my skills in the handpainted style, but I could still use a lot of practice. Should probably keep making many more of these weapons so I can really nail the style, fortunately I really like working with it. :)

Model in 3DCoat left, concept right.

I am not sure if I am completely happy with how the blade turned out as I think the concept actually looks much better, especially the colours. But compared to the textures I made around this time of year 2 years ago I would say that it is a significant improvement, in design, modeling and texturing.

onsdag 8 mars 2017

3DS Max Tutorial - Setting up Reference Planes

So my programmer friend asked me if I could make another tutorial on how I would model something more complex than a box, combining different types of geometry, and sent me a picture of a lamp. So here is part 1 in lamp modeling: setting up reference planes.


Here is the lamp in question:

tisdag 7 mars 2017

3DS Max Tutorial

A programmer friend was trying to make a 3D box and asked me to do a tutorial, so I made a short introduction to 3DS Max for beginners. Hopefully even programmer friendly! :)


torsdag 2 mars 2017

#Artwar Character Contest: Briannon | Final


This morning was the deadline for the #Artwar character contest which I am participating in. Was going to post my final entry last night, but then their forum went down. :S
Now it is posted and the deadline passed, so I just wanted to share the final result (although it is getting ahead of retopology and texturing parts.

This is the very first art contest that I am participating in and it was definitely a challenge. I am not sure it was the best idea to try and learn so many new things when working on something like this as it did take me a lot of time that could have been spent to make the model even better. But I did learn a great deal of new things, and why not push yourself? It is definitely not perfect and would not have minded one or two more weeks of just texturing, but I did finish the character and within the deadline.

Although I would like to continue working on it, I am going to do the hard thing and let her go. I am just going to accept that this is what I could do at this point, with this amount of time and resources at hand, and move on to other things. I do want to brush up my animation skills and learn more about rigging creatures, so I will probably use this character to experiment with that however. But the rest is done. (Trying to convince myself)


fredag 24 februari 2017

#Artwar Character Contest: Briannon | Part 2 - Sculpting

All right, so last time I wrote about the design process of my character for the #Artwar contest, Briannon, I wanted to follow up with a post on the modeling and sculpting. Well, when I finally had by idea on paper and was ready to get started, I had this brilliant idea that this was a great time to try and learn new things. (Now with a week left of the contest and so much work to do, I am starting to question the brilliance in my idea).

First thing I did was to try out Maya LT, which I have actually never even opened before. Thanks to my knowledge of 3D in general, I managed to get "something" at least. It did however take forever and I absolutely hated the popup-menu system for everything that has a button in 3DS Max. I can say that if I had allowed myself to use Max instead, I would have gotten a great deal further than where I am at this point. In some miraculous way, I did eventually manage to create a good enough basemesh that I could import in ZBrush and go from there.
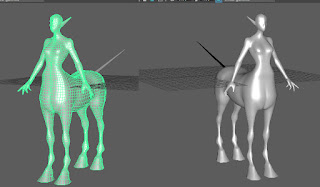
Basemesh in Maya


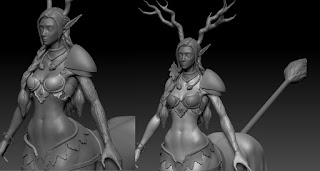
Even though it did take me a bit longer than it probably should, the body was pretty straight forwards to do. The challenge here lay in getting the anatomy right, especially on the horse part of the body.
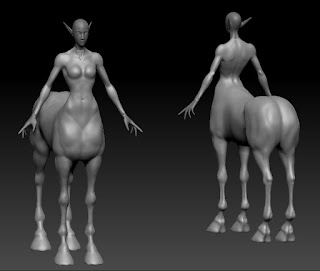
First pass on body in ZBrush


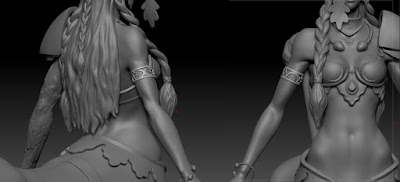
My next challenge was the hair, but with a lot of research and experimenting I managed to create and combine braids into an intricate hair style. For the future I will want to work on how to better sculpt the ends of the hair and making separate strands to get better volumes. One thing that was very helpful that I found mid-sculpting was the feature of making the window transparent so that you can place references underneath.
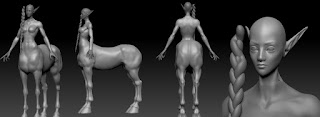
Experimenting with hair and braids


Hard surface accessories and armour is something that I would normally model in 3DS Max and then only import into ZBrush to create surface details, but since I have banned myself from using Max for this character I needed to find another way. After my experience with Maya when making the basemesh, I was really reluctant to go back to it. On the other hand, ZBrush is to my experience not optimal for hard surface modeling. Not having attempted to do something like this in either software, I had to do quite a lot of research (including mostly crappy and often barely understandable video tutorials) and experimented a bit with both.
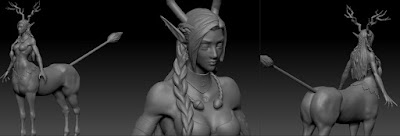
Hair Sculpt


In the end I actually did all of the sculpts in ZBrush entirely, not using what little I made in Maya. I did this by using masks, either painted directly on the model or by projecting alphas, and extruding from the existing sub tools. Strangely, something as simple as the twisted cord used for the torc and lower bracelet, was extremely challenging to find a good way to do, with a result that I wanted. I tried following other people's rope tutorials but did not like the outcome, or the quality of the tutorials were too poor. Instead of the multiple cylinders that they use, I projected a twisted alpha on a ring and used the deformation tools. The acorn, waterskin and the bag however, were  made from spheres manipulated by the move tool or zspheres.
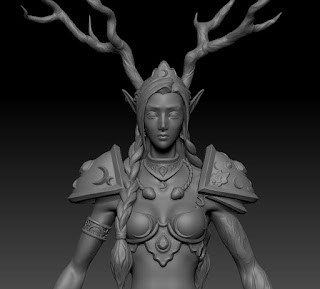
Shoulder design tests with alphas
Bracelet made with alpha


For the oak leaves and moons, I projected alphas on planes and created morph difference meshes and the just cleaned them up with deformation tools and bent the leaves and added some detail. For the 'triangular moons' and armour/jewelry details I also used alphas, by testing a technique shared by Orb in Blizzard's 2015 ZBrush Summit talk.
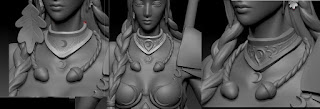
Necklace WIPs

First version of wood and resculpt WIP

The final challenge was creating the wooden parts. Since I want her to be part oak tree it needed to look like bark. The problem with oak trees is that their bark is very thick and rough and, although they are beautiful trees, not very attractive looking. I just could not get it to translate well on the more delicate character, possibly contributed by the fact that I have never sculpted wood before. Therefore I decided to represent the oak part a bit differently, I actually referenced an oak tree where the branch had wilted and the bark partly come off as well as looking at how others had solved the issue of sculpting wood. It was a bit tricky to sculpt, and it could probably be even better with practice and time, but I got the grade of 'I can tell that it is wood' and I am satisfied with the result.

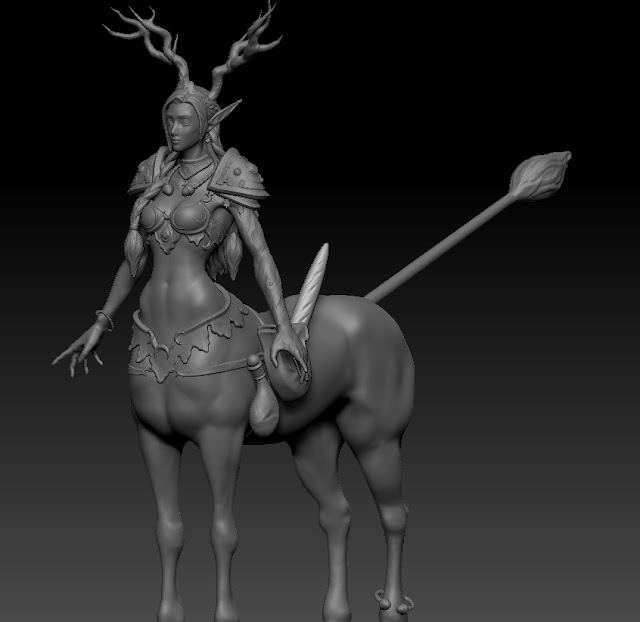
I have probably forgotten to mention a great deal of things and could definitely delve deeper into how I made each element for future reference when facing similar problems. :) But this is in general how the high poly sculpt was done, I definitely learned a lot and hope I can remember it all. The result is looking even better than I had hoped, so even though I am a bit stressed about finishing in time I am really excited about this character! :)
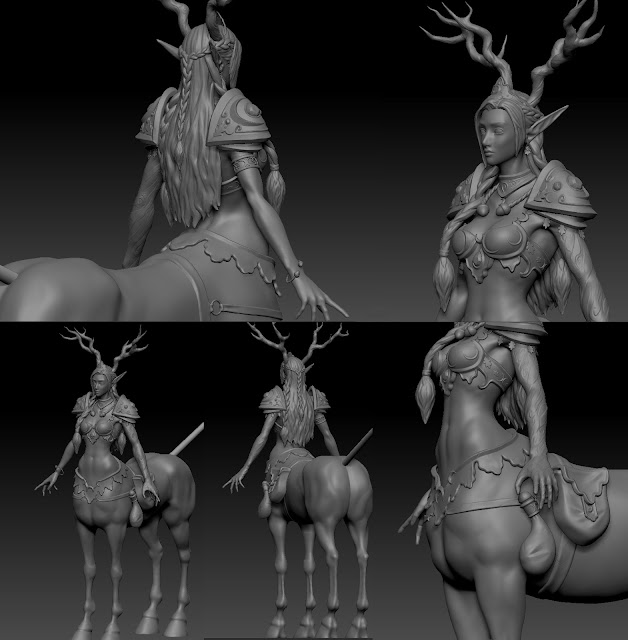
Final Sculpt
Bonus Pic

söndag 5 februari 2017

Dagger Update

Its been a while since my last post so I wanted to make a quick update on the dagger I started working on before Christmas. I chose to continue with the s-shaped dagger and based on the feedback I redesigned it by combining elements of the concepts I made and tried to tie the elements together better. For instance actually making the top "points" holding the vial into the teeth of the skull instead of having both.


I also finished the model and UV-mapped it, currently it is about 1400 tris. I got some feeback during the modeling phase to straighten the blade out, to make it look more like a functional dagger, even though it is a ceremonial weapon rather than one used for fighting.


Even though Christmas got in the way, I have started the texturing, but I have not worked on it for awhile since I have decided to focus on my entry for Cubebrush's #Artwar contest. But I will get to it as soon as I can and post some more updates and eventually a finished dagger that is looking totally awesome and portfolio ready!

Next up I will write a post on my character for the contest!

torsdag 4 februari 2016

Nihteana High Poly Armour

Last week I finished the high poly model of Nihteana, the first thing I did was to complete the shoulder pads. These skulls were also used to hang from her belt, but without the decorations.


I had a basic skull/shoulder pad that I made in 3ds Max, from that I dug out the shapes more and sharpened the details. Then I added the decorations by drawing the on by hand. I would have used a pattern to do this but I did not know a way of doing this on a surface that curves on several axes, or curves at all.


This was also a problem when creating the bracers, I had the shapes and edges complete in order to maintain the hard edges. To solve this I tried adding a sketch that I had made to test the placement of the pattern in 3ds Max through adding the texture as polypaint. There were some issues getting it right, but in the end I used spotlight to paint it on and get a general idea of the placement.


When I had it placed I used the pattern as a guide to carve the decorations into the bracers by hand. As I mentioned I could not find a way to draw the larger patterns onto the curved surface but the flowers were small enough to use the image as a brush. Since the bracer is not completely symmetrical I was also unable to use the mirror brush, meaning I had to carve the entire thing by hand.


onsdag 3 februari 2016

Back to ZBrush

Since we finally got our release out I have been able to get back to working on Nihteana. There were a few things that needed fixing but most of the work was to create the missing pieces, such as armour and belt. I had not prioritised them earlier since I wanted to test the main body in animation before completing her. In case there were any problems it would be easier to adjust before adding details. Once I got to that point however, I had to switch tasks and work on environment assets and the release that was made in early January.

My greatest issue with the model was the elbow, I had problems trying to figure out exactly were the muscles should go and how the skinny dead arms would look. I figured out that I had thought right but executed it wrong, meaning that I needed to move the muscles on the lower arm to match the "elbow bone" better and create more of a crease. This meant that I had to go back to ZBrush to adjust the Highpoly model.

This is how it looked before, the elbow bone is at the back side on the bottom of the arm, while the fold is on the front side of the arm.


When fixing it I moved the fold to the upper part of the arm, so that it would be in a straight line from the bone of the elbow.


I had also decided to enlarge her hands, to achieve a more stylised and creepy look, again this meant making adjustments in the Highpoly. The hands were also a bit flat so I rounded the hand, lowering the sides with the pinky and thumb and raising it around the middle finger. Even though I thought I had adjusted where the fingers start on the hand (they do not start from a straight line) it was also looking too straight so I pushed it towards the hand between the pinky and ring finger and away from it between the ring and middle fingers to make the silhouette more interesting.


Because of making these adjustments I destroyed some of the details, meaning that I had to re-enforce the knuckles and sinews. As I had to to this I tried to emphasise them even more than I ad before.


I was planning on showing the armour pieces and belt that I have been working on, but this turned out pretty long so I will save that for the next post. :)

tisdag 10 november 2015

Working on Tammy's rig

I have been tweaking Tamarrion's rig to get better results when animating the shoulder, as an extension of the work that I have done with the edge flow. I am still unsure about the best way to place the rig, but I am hoping that I am better on the mark this time around. On the left side I have moved the shoulder and arm bones to where the actual bones should be. The reason for them being where they were was a process of trying to find what looked the least bad when animating the shoulder, as we had lots of problems. As mentioned before these problems were the result of a combination of the edge flow and the rig.


I have also started working on the skinning, I had to redo it completely although hoping to be able to copy at least parts but hopefully I have learned something along the way and achieved a better result this time. Again I am not one hundred percent sure of my abilities and the result. I guess we will have to see how it goes with the animations.

I'll end with some pics of the result when trying to copy the old skin layer to the new model, I hoped that at least the legs could be partly intact since they had not been touched, but here is what happened.


lördag 17 oktober 2015

Shoulders

I got some really good feedback on how to improve my edge flow of the shoulders even further (thanks Nat!) and I have tried to adapt it towards that. I know that there are a lot of triangles on the back and thought about fixing that, but I remember one of our teachers saying that triangles should not make a difference since the computer triangulates everything anyway. Therefore I decided that I wanted to keep control of how they triangulate.


I am sure that there are still things that can be improved upon the shoulder but I feel that I have gotten a long way and have probably learned a thing or two about modeling shoulders.


Apart from the edge flow I have worked in z-brush to rotate her high-poly arm into position and adjusting the shoulder so that it looks good. After that I went back into Max to adjust the lowpoly just to fit the high-poly better.


I also added some muscles to her arm as from the feedback we have been given, some people do not understand the vision we had about creating contrast with size, so we wanted to see how it would look with some more muscles. We felt that the result made her character design better and decided to keep it. Therefore I had to do some alterations in Max, adding some geometry and moving vertices around. While I was working on the arm anyway I also tried to define her elbow just a little bit more to enforce the style we want to achieve.

This might seem to have taken a lot of time, which it did, but most of the day I have been busy writing lore, some of which you can read on our team's dev blog today. We are planning to do a series of lore posts, this was the first one giving a short introduction to Tamarrion herself. You can read it here: https://tamarriongame.wordpress.com/2015/10/16/lore-day-1-tamarrion/

torsdag 15 oktober 2015

Solutions

After two days or so of doing not much other than finding problems we have now, finally, started to find some solutions both with Tamarrion and the environments.

After yesterday's problems with Tamarrion's mesh I restarted after being unable to find a solution but the problem occurred again after saving the file. I had hoped that I could keep the skin data so that I could adjust the arm before rotating it to get a more accurate result but it turned out that that was just not going to happen.


What I had to do was to start with using the rig to rotate the arm slightly, although I could not move it a lot as there was to much deformation of the upper arm, which is the exact problem that I wanted to fix. It took a lot of thinking and moving vertices but I somehow started to make sense of the messy chaos that were her shoulders and ended up with something that is not too bad looking.


There are some stars and weird shapes going on in certain places, but I have left that since she will never be seen without her armour. I was advised to try and clear some polys that go underneath the armour as well so that I will not have to skin more vertices than are necessary to hold the shape.


The good thing is that after redoing the typology of the shoulder I will probably never create a bad shoulder again, at least not the front of one, the back is still somewhat of a mess and a mystery.

onsdag 14 oktober 2015

Tamarrion Update

Due to lack of time and experience there are some issues with Tamarrion's model, mainly her shoulders. There is something that never got quite right with the skinning and the bare one is looking weird which I mentioned in my previous post where I attempted some fixing.

It turned out that the problem was bigger than first anticipated and we finally were told where the problems were coming from. Not only was it due to the skinning and A-pose, but the typology not being organic enough and following the muscle structure.

This means that to fix her I need to redraw the typology, rotate her arms up a bit, adjust the rig slightly before shaping the armpit and finally redoing the skinning and at least part of the textures. I started with redoing the typology today and have at least started to get somewhere with the front of the shoulder.


Of course that led to new problems as Max decided to have a party with the skinning layer and left Tamarrion as a complete mess. I was hoping to use the skinning just to rotate her arms but I might just have to give that thought up.


We have a lot to do and a lot to think of as a dissonance is occurring between the characters and environments and we have found several issues that need to be addressed. I am just glad that we have found them so early on and not later.

måndag 12 oktober 2015

Problems

Today has been a marvellous day of setbacks. Apart from successfully adding some widgets to our blog the day has been full of nothing but problems.

I have been looking at updating Tamarrion's model to fix her shoulders but there have been problems with the length of the arms, shaping the shoulders, the rig and the skinning. That means pretty much everything.

Without having found any solutions yet I am a least aware of a great deal of issues now and I'll leave you with some pretty pictures of todays adventures with Tamarrion!


torsdag 8 oktober 2015

Boss Sneak Peek

So this is yet another sneak peek, this time it is not of Tamarrion but the new boss character that she will be fighting in a near future.

I have been working on this character while doing other school and Tamarrion related assignments for a few weeks now and she is starting to come to life. I started working on a base mesh in Max over the weekend and today I finished sculpting her upper body in Z-Brush. There is still a lot to do, but I just wanted to post a little update to show what i have been working on.


If you want to know more about Tamarrion just visit our facebook page or our website that is now up and running!
https://www.facebook.com/tamarrion
http://tamarriongame.com/