
Visar inlägg med etikett 5SD037. Visa alla inlägg
Visar inlägg med etikett 5SD037. Visa alla inlägg
söndag 17 maj 2015

fredag 15 maj 2015
måndag 11 maj 2015
Polypainting
Since the issue of polypaint not being able to be exported resolved I continued painting on the high poly model. Apart from the skin, especially the face that is the most complex part on the model, I have done little more than basic details. I have added light to all edges to make them look worn, and darkened creases.

As we want to create a hand painted look I have basically just blocked out where it should be lighter and darker. I would have done the same in Photoshop before going into details, had I done it all by hand. I think that it does not affect the time very much in any direction. The painting itself does take a bit longer to actually paint because Z-brush does not have as easy and accurate controls as Photoshop has, on the other hand it does give me increased accuracy as i can immediately place the colour shifts exactly where I want them, or as close as Z-brush's controls let me. In Photoshop I would have to estimate, save, check Max to see how it looks, make adjustments, save, look... until it looks right.

My conclusion from this, experiment I guess you can call it since I am trying to find new and improved ways to work, is that it is a fast and easy way to block in details. It is far easier painting on the high poly where you can clearly see all creases and details than it is working on UV templates. Even though it does take slightly longer to actually paint, it is sped up by the fact that you can use a mirrored brush so that you can paint general details on, for instance, two leg guards at once and that you can see exactly where the paint should be placed and how it looks in 3D.
Since I have only used Z-brush a few weeks and tried polypainting in it only two days there are probably many tricks that I don't know about that would give better and more accurate results, for instance sharper details. From what i have experienced so far though, I do not see that it could be an alternative for Photoshop when it comes to cleaning and detail work.

During the first bake the hair was not correctly baked and the high poly of the corset went missing so the Diffuse for the body had to be redone, as it got too late at night we have not been able to rebake at the time of writing this. The eyes, boots and hair decorations also look strange since they were not included on the high poly, they have been painted separately so the two maps will need to be merged. The limitations I discussed are very clear here, in particular the pants, as the paint is very blurry. It is very possible that it is only due to my unfamiliarity with how to use the brushes and program though.
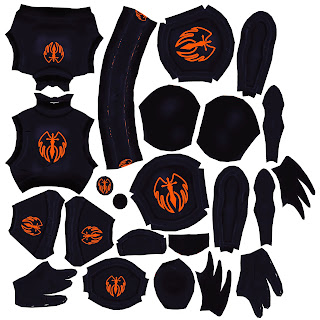
There were also some problems with the armour Diffuse, probably caused in xNormal. The belt is my fault since I was tired and merged the belt buckle to the belt on the high poly, which means the belt buckle was projected onto the belt. This is easily fixed by just painting it over, that area will be covered by the buckle anyway. The orange gaps on some parts, for example the belt, are a bit of a mystery though. If xNormal had problems projecting, or seeing, the edges, they should be white, we have no idea where the orange came from. Apart from that the armour pieces came out beautifully and it is just a matter of getting the details down.

As we want to create a hand painted look I have basically just blocked out where it should be lighter and darker. I would have done the same in Photoshop before going into details, had I done it all by hand. I think that it does not affect the time very much in any direction. The painting itself does take a bit longer to actually paint because Z-brush does not have as easy and accurate controls as Photoshop has, on the other hand it does give me increased accuracy as i can immediately place the colour shifts exactly where I want them, or as close as Z-brush's controls let me. In Photoshop I would have to estimate, save, check Max to see how it looks, make adjustments, save, look... until it looks right.

My conclusion from this, experiment I guess you can call it since I am trying to find new and improved ways to work, is that it is a fast and easy way to block in details. It is far easier painting on the high poly where you can clearly see all creases and details than it is working on UV templates. Even though it does take slightly longer to actually paint, it is sped up by the fact that you can use a mirrored brush so that you can paint general details on, for instance, two leg guards at once and that you can see exactly where the paint should be placed and how it looks in 3D.
Since I have only used Z-brush a few weeks and tried polypainting in it only two days there are probably many tricks that I don't know about that would give better and more accurate results, for instance sharper details. From what i have experienced so far though, I do not see that it could be an alternative for Photoshop when it comes to cleaning and detail work.

During the first bake the hair was not correctly baked and the high poly of the corset went missing so the Diffuse for the body had to be redone, as it got too late at night we have not been able to rebake at the time of writing this. The eyes, boots and hair decorations also look strange since they were not included on the high poly, they have been painted separately so the two maps will need to be merged. The limitations I discussed are very clear here, in particular the pants, as the paint is very blurry. It is very possible that it is only due to my unfamiliarity with how to use the brushes and program though.

There were also some problems with the armour Diffuse, probably caused in xNormal. The belt is my fault since I was tired and merged the belt buckle to the belt on the high poly, which means the belt buckle was projected onto the belt. This is easily fixed by just painting it over, that area will be covered by the buckle anyway. The orange gaps on some parts, for example the belt, are a bit of a mystery though. If xNormal had problems projecting, or seeing, the edges, they should be white, we have no idea where the orange came from. Apart from that the armour pieces came out beautifully and it is just a matter of getting the details down.
söndag 10 maj 2015
Logo
What I have probably spent the most time on this week though is probably the logo, I started with some super fast sketches, just to get some ideas to base it on. After conferring with the teachers and my team I decided upon one design to continue working on one of them. I had a font in mind that we have used so far, after not finding anything better I decided to take it into illustrator and made it thicker and adjusted the size of the first and last letters.
 |
| Original Logo |
 |
| Quick sketches for basic layout |

Since Illustrator is not a friend of mine I decided to take it into Photoshop and continue working on it there. Probably the main change I did was making the serifs pointier and at a better looking angle. I started thinking of how I should go about colouring it to get the style I wanted. One night, inspired by one of my team mates asking me if I would take it into z-brush and do it properly as a joke, I thought of trying to create the letters in max so that I would have a base to work from with straight edges and basic lighting.
 |
| Font exported from Illustrator and fixed in Photoshop |
 |
| Early version of Layout in Photoshop |
Creating the letters went really fast, I started with planes and extruded until I had the basic shapes, then I added loops in the centres so that I would get the effect I wanted (see picture below) and moved them slightly forwards. The final step of the modeling was extruding the edges back so that they got some more depth. I did the same for the frame, I only made a quarter of it and mirrored it twice.
The next step was trickier as I had to figure out how to place the smoothing groups to get the straight edges where I wanted them. The letters that were rounded, O and R, I had to add edge loops around all edges so that I could meshsmooth them as they were looking jagged even with smoothing groups. It was hard to figure out how to place the loops on the complex shapes on the R so that I would keep my hard edges but not get any unwanted ones. In the end it turned out quite good though not perfect.
Had I had more time I would probably have experimented with meshsmoothing all of them and taking them into z-brush as I think I could have added a lot of character to them that fits the art style. It might not be the best way to do it but it would be fun to try it out.
 |
| From the rendering process in Max |
Instead I added a light pointing in the direction I wanted and rendered PNGs of the text, frame and symbol that my team mate created for the main menu book and is seen on Tamarrion's armour. I used them to create colour blocks of the shapes, by doing it this way I managed to get very straight edges which are important in case we would like to print the Logo on a larger surface.
I duplicated the layers and played around with layer modes and a base colour layer to get the general colours and lighting that I wanted. Then I started hand painting in coloured highlights and shadows, making the text and frame more interesting and most importantly, truly visible. When they were very clear I added smaller details in the form of little cuts to give it more character and look more hand-made. This is the part that might have gotten a really good result in z-brush.
 |
| Frame and Font at point of only needing details and polish |
The next step was to fix the background and the symbol so they would be at the same level of polish. This gave me quite a challenge, in the end I added colour to the shadows and highlights of the symbol and used a textured brush on a lighting dodge layer to make the background more interesting. I did not work the symbol any more because I do not want it to steal attention from the name of the game, but also from the time limit.
 |
| Final Logo that was handed in |
If I have time I might continue doing some work on it but I do not see if it will do any good as everything it should be on will already be in print at that time. Also I am not at all happy with the background, I do not think it looks the way I would like and it looks a bit unfinished which I do not like. The text and frame turned out really well though, and most importantly they are very visible even when zoomed out.
lördag 9 maj 2015
So Happy
In my last post I described how we had been unable to find any solutions to baking diffuse maps from Z-brush since the polycount was too high. It turned out that we had been up all night and wasted most of the morning in vain as the polypaint I had created would not be able to be used.
Being the way I am, I refused to accept this.
After two and a half hours of intense googling and experimenting in z-brush I found a possible solution to the problem in xNormal. I tried exporting one of the subtools again and noticed that it said "exporting polypaint" which meant that they would have followed with the .OBJ-file. Apparently xNormal has default settings which ignore per vertex colour, which was exactly what we were trying to export.
As it was impossible to find a clear step by step answer to how to solve this I will try and explain it as best as I can, hopefully it might give someone less of a headache sometime.
I used color to paint the high poly model and then merged together all parts that belonged to the same piece. For example the chest piece has a logo on it which is easier to paint as a separate sub-tool so that the colours do not bleed, but it is easier to manage fewer files, so when I was done I merged them into one sub-tool.
The next step is to simply export the sub-tools one by one as .OBJ-files. The polypaint will automatically follow.
In xNormal you must then uncheck "ignore per vertex color" in two places. One is on the high poly itself in the high poly tab and the other is in the "bake options" tab.


After that it is just a matter of choosing your preferred settings and bake the maps.
I will after all be able to use my five hours of work, I can continue placing basic colours on the high poly so I can see where all details should go and then fix the details in Photoshop and get a hand painted look. It turns out that the only part that was in vain was part of the stress we felt yesterday. From wanting to give up and cry, everything feels so much better now and I am so happy!
Being the way I am, I refused to accept this.
After two and a half hours of intense googling and experimenting in z-brush I found a possible solution to the problem in xNormal. I tried exporting one of the subtools again and noticed that it said "exporting polypaint" which meant that they would have followed with the .OBJ-file. Apparently xNormal has default settings which ignore per vertex colour, which was exactly what we were trying to export.
As it was impossible to find a clear step by step answer to how to solve this I will try and explain it as best as I can, hopefully it might give someone less of a headache sometime.
I used color to paint the high poly model and then merged together all parts that belonged to the same piece. For example the chest piece has a logo on it which is easier to paint as a separate sub-tool so that the colours do not bleed, but it is easier to manage fewer files, so when I was done I merged them into one sub-tool.
The next step is to simply export the sub-tools one by one as .OBJ-files. The polypaint will automatically follow.
In xNormal you must then uncheck "ignore per vertex color" in two places. One is on the high poly itself in the high poly tab and the other is in the "bake options" tab.


After that it is just a matter of choosing your preferred settings and bake the maps.
I will after all be able to use my five hours of work, I can continue placing basic colours on the high poly so I can see where all details should go and then fix the details in Photoshop and get a hand painted look. It turns out that the only part that was in vain was part of the stress we felt yesterday. From wanting to give up and cry, everything feels so much better now and I am so happy!
Textures and Screenshots
This week has been busier than any week so far, especially us artists have had an insane amount of work to get done and it is not going to slow down before the end of this project. Today we had deadlines for handing in promotional material containing at least a finished Logo, four screenshots and four concept art/dev images as well as playtesting with the other students.
Us artists did not get to the playtesting since we had to work towards our deadline and we had a visitor helping us out with shaders and Unity.
I have been working simultaneously on the texturing of the character and the Logo, but I have also spent time with the other artists going through lighting and the regular giving feedback as well as searching for fonts. I started out the week by doing final touches, UV-mapping the main character and the armour and exporting all parts of the low- and high-polys so that I could send then to my team mate so he could bake normal maps and ambient occlusion.
When the UV-mapping was all done I got started on the diffuse maps, since I have had so much else to do I did not manage to complete them entirely yet. I have blocked in all base colours and started to add details. I quickly noticed how difficult some parts were to paint as I had to figure out how the UV-s translate to the model, the eyebrows is one example of this as she looked very surprised in the first iteration.
I did have the normal map to work from but it did not prove to be perfect, I am thinking that I should probably use the ambient occlusion map to help me out with that. I did come to the conclusion that the tricky parts would be so much easier to just paint on the model, so we went in to Z-brush and managed to figure out how to paint on the model. Late at night we felt it was time to stop and I exported the sub-tools so that my team mate could bake them. It turned out that you cannot do that as the colour did not get exported with the sub-tool.
This meant that the day of the deadline which we had planned to spend on the screen-shots alone, had to be spent trying to get the textures from z-brush and into the game for playtesting and screens. We found a solution which meant that we had to create UVs and textures within z-brush. After three hours of crashing the program and searching Google we found that z-brush cannot create UVs on a model with that much resolution. This was a major set-back as all work spent on painting it has to be done again, without painting on the model making it easier.
I had to give up and hurry to merge the model with the UVs with the one that has been skinned, this meant only copying and pasting the skin layer, so that will need to have a look at. The model was then sent to a second team mate to plot to the placeholder animations before being sent to the coders to put it into the game with the unfinished textures.
The ambient occlusion and normal maps are complete and look beautiful but the diffuse maps still need work and I need to create emissive maps for her runes and eyes. This is what I will be spending my weekend on as I want to be free to work on animations and UI next week.
Both the UI and the menus need new, non programmer-art, graphics and we also need to create particles and fancy effects and feedback.


 |
| Screenshot created by my fellow artists |
Us artists did not get to the playtesting since we had to work towards our deadline and we had a visitor helping us out with shaders and Unity.
I have been working simultaneously on the texturing of the character and the Logo, but I have also spent time with the other artists going through lighting and the regular giving feedback as well as searching for fonts. I started out the week by doing final touches, UV-mapping the main character and the armour and exporting all parts of the low- and high-polys so that I could send then to my team mate so he could bake normal maps and ambient occlusion.
 |
| While UV-mapping the UV checker turned into rainbow war paint |
When the UV-mapping was all done I got started on the diffuse maps, since I have had so much else to do I did not manage to complete them entirely yet. I have blocked in all base colours and started to add details. I quickly noticed how difficult some parts were to paint as I had to figure out how the UV-s translate to the model, the eyebrows is one example of this as she looked very surprised in the first iteration.
I did have the normal map to work from but it did not prove to be perfect, I am thinking that I should probably use the ambient occlusion map to help me out with that. I did come to the conclusion that the tricky parts would be so much easier to just paint on the model, so we went in to Z-brush and managed to figure out how to paint on the model. Late at night we felt it was time to stop and I exported the sub-tools so that my team mate could bake them. It turned out that you cannot do that as the colour did not get exported with the sub-tool.
 |
| From the colouring process in z-brush |
This meant that the day of the deadline which we had planned to spend on the screen-shots alone, had to be spent trying to get the textures from z-brush and into the game for playtesting and screens. We found a solution which meant that we had to create UVs and textures within z-brush. After three hours of crashing the program and searching Google we found that z-brush cannot create UVs on a model with that much resolution. This was a major set-back as all work spent on painting it has to be done again, without painting on the model making it easier.
 |
| Very early iteration of Diffuse maps |
I had to give up and hurry to merge the model with the UVs with the one that has been skinned, this meant only copying and pasting the skin layer, so that will need to have a look at. The model was then sent to a second team mate to plot to the placeholder animations before being sent to the coders to put it into the game with the unfinished textures.
The ambient occlusion and normal maps are complete and look beautiful but the diffuse maps still need work and I need to create emissive maps for her runes and eyes. This is what I will be spending my weekend on as I want to be free to work on animations and UI next week.
Both the UI and the menus need new, non programmer-art, graphics and we also need to create particles and fancy effects and feedback.
söndag 3 maj 2015
Five Weeks Down
This week has gone by super fast and I am still feeling a bit stressed, I think that we will need to kick in an even higher gear next week.
I do have a lot of tasks that demand my attention but I will focus on what I have done for the main character this week. Firstly I needed to make even more changes to the braid after getting feedback from our teachers, which meant redoing the high-poly for it as well. Twice. In the end it turned out well I think, my only concern is that it is so big that it might cover much of the armour on her backside. But the game is all about movement which means that the braid will not be much in the same place and I do feel that it will add a lot to the character. This is how the final high-poly turned out. (Final as in there is no time to fix anything even if we would want to).


When that was done I started working on the highpolys for all of her armour, I have created all of the armour in 3Ds Max as it is easiest to get smooth hard surfaces. The next step will be to take them into Z-brush to just add details that will make it fit into the art style better and look worn. This will be done by treating the edges in the same way as the environment artist has treated the edges of metal objects, meaning I will need to sit down with the artists to discuss exactly what tools he used and put it into the style guide. I will also add cuts in the armour so that it looks as if she has been in fights before, although her armour is still relatively new.

To make the buckles on the leather corset I borrowed a part of the lock mechanism on her book of light which will give cohesion to the style as well as between the character and her book. I also added the logo from the book and placed it upon various places on her armour. The writings on her armour will be completely done in 2D textures instead of engraving them in 3D which would be completely unneccessary. To create a normal map for them with depth, I would only need to make them dark against a light surface and bake normals from that before merging it with the other normal maps.


I do have a lot of tasks that demand my attention but I will focus on what I have done for the main character this week. Firstly I needed to make even more changes to the braid after getting feedback from our teachers, which meant redoing the high-poly for it as well. Twice. In the end it turned out well I think, my only concern is that it is so big that it might cover much of the armour on her backside. But the game is all about movement which means that the braid will not be much in the same place and I do feel that it will add a lot to the character. This is how the final high-poly turned out. (Final as in there is no time to fix anything even if we would want to).
When that was done I started working on the highpolys for all of her armour, I have created all of the armour in 3Ds Max as it is easiest to get smooth hard surfaces. The next step will be to take them into Z-brush to just add details that will make it fit into the art style better and look worn. This will be done by treating the edges in the same way as the environment artist has treated the edges of metal objects, meaning I will need to sit down with the artists to discuss exactly what tools he used and put it into the style guide. I will also add cuts in the armour so that it looks as if she has been in fights before, although her armour is still relatively new.
To make the buckles on the leather corset I borrowed a part of the lock mechanism on her book of light which will give cohesion to the style as well as between the character and her book. I also added the logo from the book and placed it upon various places on her armour. The writings on her armour will be completely done in 2D textures instead of engraving them in 3D which would be completely unneccessary. To create a normal map for them with depth, I would only need to make them dark against a light surface and bake normals from that before merging it with the other normal maps.
onsdag 22 april 2015
Tamarrion Low-Poly
Yesterday I finished the work on the low-poly mesh of the character that I am working on. There may still need to be some adjustments to do on the main body but it is nearly complete and I added the boots and her face. The only thing left is her hair before moving on to create her armour pieces, I already started a bit with the leather corset that she will be wearing.
As I had already created a base mesh that I used to create the high-poly in z-brush I used that as a base for my low-poly, adjusting it on top of the high-poly. The boots showed me the same problem that I previously had with the pants, which was to create the creases. It turned out to be far trickier than I first thought as I want to use the typology that I have rather than just adding more and more polys. As she will be animated I also ave to consider the edgeflow so that there will be no strange deformations. I tried solving the problem by creating the main shapes of the folds, including the breaks in silhouette while leaving all details to maps. Perhaps there are still things that can be improved both on the boots and legs but I believe that it will work as it is now.

Another problematic area were the hands. The typology was initially pretty much chaos. I looked for references on hand typology that I used to get a better idea of how the edgeflow should be. For this I had some help from one of my team mates that had faced the same problems in the previous course. Again, it could probably be improved but it looks ok and hopefully it will work as her hands are an essential part of the game, being used both to hold her weapon and to cast spells. Here I believe I have some advantage as her glove will be quite dark which will help to hide errors.

In opposite of what I have done with her body and boots I decided not to use the head of the base mesh, instead I deleted it and started from scratch from planes. The reasoning behind this was to create a functional edge flow. When creating the base mesh I only focused on getting the silhouette fast so that I could get started with z-brush, with little thought of the typology.
The face did prove to be a challenge but in the end I think that the edge flow came out ok, although it is not perfect. The first thing I did was to open a close up of her face in Photoshop, trying to think of approximately how to place the edgeflow. I drew on top of it to get a general idea and remember how it should look. I also took some time to find some examples among the tutorials we have been suggested in previous 3D courses.
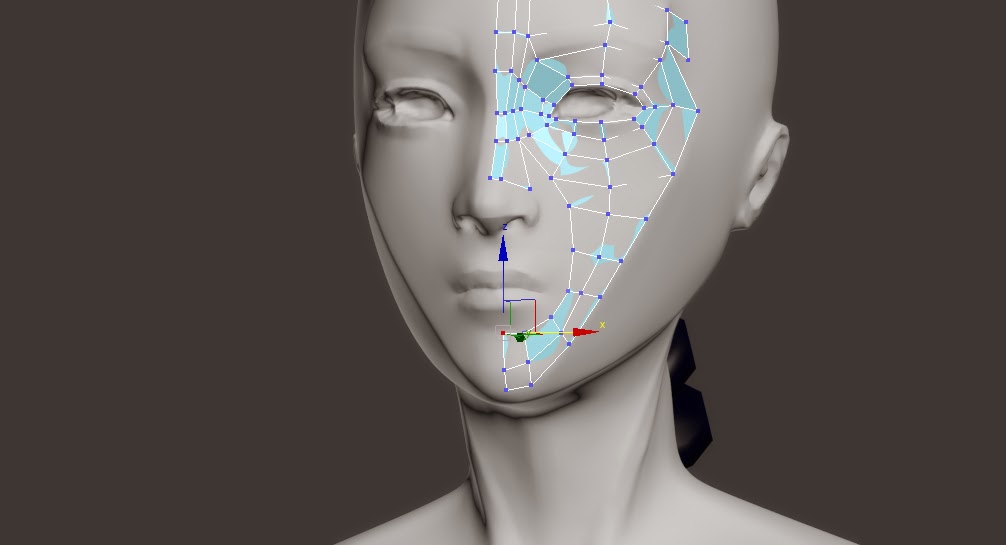
I started the modeling with a single plane on the edge of her upper eyelid and extruding it to the sides to circle the eye, all the while making sure that the loops matched vertically and that I had the same amount of polys on both eyelids. From there I continued circling her eye, moving towards the nose and cheek, this is where the problems started to line up with starshapes and triangles while trying to follow the shape of her face. I did have to stop and think several times to think of how to continue and where the loops should go.
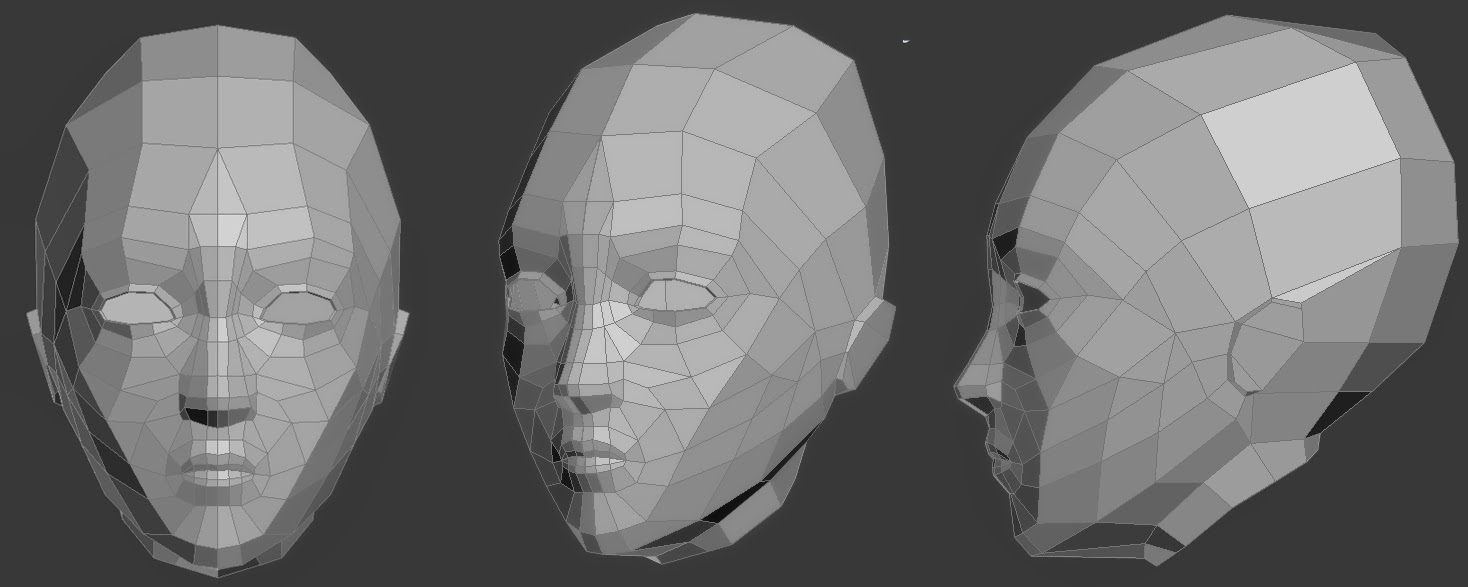
Since the character will mostly be seen from the back I did not want to spend too many polygons on the face. I did however want the face to still look good as it might be useful for later stages. Perhaps if we decide that we want to continue working on the game we might want to add things where she will be seen from the front. We might also want to have her visible in the inventory menu, so that the player can actually see the character that they are playing as. If we need to make adjustments to the camera her face might also be visible more often, the way it is now it will be occasionally when turning. Another reason is promotional material, while creating cinematics and trailers we will very likely want to show her face. For these reasons I have also added bones to her face to accommodate for facial animations although I deem it very unlikely to be entered into the vertical slice that we are developing now.
When the hair is complete and I want to start assembling all the pieces of her together I will probably delete some of the polygons that now forms her head as they will not be necessary. At this point we just want the low-poly to be complete as soon as possible so the coders get something to work with, this means that she will be bald for a while. As I still need to do a high-poly for it I decided to complete the most necessary parts of the low-poly so that it can be tested inside the game as all other parts can just be added to it since the rig is already complete and waiting for them.

The rig is one of the things that I continued working on today as we wanted to get the pretty much finished low-poly into the engine to test. It was done for the base mesh so it needed some small adjustments to hands and ankles as well as the braid which I did as a "tail" rather than just regular bones. I also added weapon attachments to both her hands as I had forgotten to do that previously and bones for her face. I still need to add weapon attachment bones to her hip and perhaps her back so that she will be able to sheathe her blade. I am just now starting to think that maybe I should add a bone to her left arm so that we will be able to give her a shield, should we decide to continue with the game. I realize how important to get the rig right at this point, because once it is done and animations are applied to it, it cannot be changed, at the risk of having to redo all animations. Therefore I think it important to accommodate for all possibilities that we might want to add now, even though we might not need it right away.


I also worked on the hair today, yesterday I made tiny adjustments to the top part of the braid to make it a bit bore asymetrical. today I started trying to figure out how to create the hair. Up until now I have created a "helmet" so that I would have some thickness and volume to work with in z-brush. I am however very uncertain of how to continue on from here, much because I have never modeled hair before. I have very limited knowledge of where to even start. I am thinking that maybe I should create a high-poly in z-brush with what I have now and then create it from planes based on that. It could probably work to keep what I have though, so that I can keep the volume, as having it as just one piece works with the art style that we have chosen and add perhaps one plane on each side for the bangs and maybe another to break up the silhouette. I had a look at World of Warcraft models and they seem to model the hair as one piece (ponytails) and add a few planes, I may not have the skills that the people working there just yet but I think I could try to create something similar.

There are still so many things to be said but this is getting extremely long and my hands are starting to hurt from typing so I will just have to continue working on the model and discuss my problems another time.
As I had already created a base mesh that I used to create the high-poly in z-brush I used that as a base for my low-poly, adjusting it on top of the high-poly. The boots showed me the same problem that I previously had with the pants, which was to create the creases. It turned out to be far trickier than I first thought as I want to use the typology that I have rather than just adding more and more polys. As she will be animated I also ave to consider the edgeflow so that there will be no strange deformations. I tried solving the problem by creating the main shapes of the folds, including the breaks in silhouette while leaving all details to maps. Perhaps there are still things that can be improved both on the boots and legs but I believe that it will work as it is now.
Another problematic area were the hands. The typology was initially pretty much chaos. I looked for references on hand typology that I used to get a better idea of how the edgeflow should be. For this I had some help from one of my team mates that had faced the same problems in the previous course. Again, it could probably be improved but it looks ok and hopefully it will work as her hands are an essential part of the game, being used both to hold her weapon and to cast spells. Here I believe I have some advantage as her glove will be quite dark which will help to hide errors.
In opposite of what I have done with her body and boots I decided not to use the head of the base mesh, instead I deleted it and started from scratch from planes. The reasoning behind this was to create a functional edge flow. When creating the base mesh I only focused on getting the silhouette fast so that I could get started with z-brush, with little thought of the typology.
 |
| Planning turned out a lot harder than planned. |
The face did prove to be a challenge but in the end I think that the edge flow came out ok, although it is not perfect. The first thing I did was to open a close up of her face in Photoshop, trying to think of approximately how to place the edgeflow. I drew on top of it to get a general idea and remember how it should look. I also took some time to find some examples among the tutorials we have been suggested in previous 3D courses.
I started the modeling with a single plane on the edge of her upper eyelid and extruding it to the sides to circle the eye, all the while making sure that the loops matched vertically and that I had the same amount of polys on both eyelids. From there I continued circling her eye, moving towards the nose and cheek, this is where the problems started to line up with starshapes and triangles while trying to follow the shape of her face. I did have to stop and think several times to think of how to continue and where the loops should go.
Since the character will mostly be seen from the back I did not want to spend too many polygons on the face. I did however want the face to still look good as it might be useful for later stages. Perhaps if we decide that we want to continue working on the game we might want to add things where she will be seen from the front. We might also want to have her visible in the inventory menu, so that the player can actually see the character that they are playing as. If we need to make adjustments to the camera her face might also be visible more often, the way it is now it will be occasionally when turning. Another reason is promotional material, while creating cinematics and trailers we will very likely want to show her face. For these reasons I have also added bones to her face to accommodate for facial animations although I deem it very unlikely to be entered into the vertical slice that we are developing now.
When the hair is complete and I want to start assembling all the pieces of her together I will probably delete some of the polygons that now forms her head as they will not be necessary. At this point we just want the low-poly to be complete as soon as possible so the coders get something to work with, this means that she will be bald for a while. As I still need to do a high-poly for it I decided to complete the most necessary parts of the low-poly so that it can be tested inside the game as all other parts can just be added to it since the rig is already complete and waiting for them.
The rig is one of the things that I continued working on today as we wanted to get the pretty much finished low-poly into the engine to test. It was done for the base mesh so it needed some small adjustments to hands and ankles as well as the braid which I did as a "tail" rather than just regular bones. I also added weapon attachments to both her hands as I had forgotten to do that previously and bones for her face. I still need to add weapon attachment bones to her hip and perhaps her back so that she will be able to sheathe her blade. I am just now starting to think that maybe I should add a bone to her left arm so that we will be able to give her a shield, should we decide to continue with the game. I realize how important to get the rig right at this point, because once it is done and animations are applied to it, it cannot be changed, at the risk of having to redo all animations. Therefore I think it important to accommodate for all possibilities that we might want to add now, even though we might not need it right away.
I also worked on the hair today, yesterday I made tiny adjustments to the top part of the braid to make it a bit bore asymetrical. today I started trying to figure out how to create the hair. Up until now I have created a "helmet" so that I would have some thickness and volume to work with in z-brush. I am however very uncertain of how to continue on from here, much because I have never modeled hair before. I have very limited knowledge of where to even start. I am thinking that maybe I should create a high-poly in z-brush with what I have now and then create it from planes based on that. It could probably work to keep what I have though, so that I can keep the volume, as having it as just one piece works with the art style that we have chosen and add perhaps one plane on each side for the bangs and maybe another to break up the silhouette. I had a look at World of Warcraft models and they seem to model the hair as one piece (ponytails) and add a few planes, I may not have the skills that the people working there just yet but I think I could try to create something similar.
There are still so many things to be said but this is getting extremely long and my hands are starting to hurt from typing so I will just have to continue working on the model and discuss my problems another time.
fredag 17 april 2015
End of Week 3
Now the 3rd week of the project has come to an end, it has gone by really fast and it feels like it should be Wednesday and not Friday. So where are we in the planning? The coders are still doing really well and it looks like we will be able to make our ALPHA-deadline next Friday. On the art side all items needed for the environments have at least base meshes although some still need polishing on the high-polys. The characters are slowly coming along, again I would have liked to come further at this point, but I managed to complete the high-poly of the body yesterday morning. This meant that I managed to make the mid-week deadline for it that I hoped to make and that I could start creating a base mesh for her hair.

I also did a basic rig and quick skinning yesterday although it somehow got broken in Max and I had to redo it today. I also threw the skinned and rigged character into MotionBuilder to test it with some mocap-data I have with sword fighters. It looked real good and it does not seem as if her armour will cause much problems since they are so close fitting on her body.

When I had done that I started reworking the base mesh to create a low-poly so that I can give it to the coders to put in the game with some rough animations. I did not get too far with it though as I also had to spend some time discussing the boss's name with the designer and team, the lighting and colours in the scene as well as design of floor and walls with the environmental artists and giving feedback on the boss character's development.

I also have to form a synopsis for the report that I will be writing on the project in order to get my degree. I need to form a testable hypothesis, question or statement, state what methods I will use to test it and what literature I will reference. It is supposed to reflect what I have done on the project and my learning across the 2 years of school. I have no idea what to choose. Should I go with something producer-related or art? Perhaps something about working two separate roles? If I go with something about art, which part? I will not work on one single thing on the project, but will rather have to divide my attention on a great amount of vastly different tasks, including planning, character design and development, building a background story and world, designing UI and menus as well as logos and ordering t-shirts. It just seems so difficult to choose and I think no matter what part I choose it will not be something that I will spend all of the 8 weeks doing.
I also did a basic rig and quick skinning yesterday although it somehow got broken in Max and I had to redo it today. I also threw the skinned and rigged character into MotionBuilder to test it with some mocap-data I have with sword fighters. It looked real good and it does not seem as if her armour will cause much problems since they are so close fitting on her body.
When I had done that I started reworking the base mesh to create a low-poly so that I can give it to the coders to put in the game with some rough animations. I did not get too far with it though as I also had to spend some time discussing the boss's name with the designer and team, the lighting and colours in the scene as well as design of floor and walls with the environmental artists and giving feedback on the boss character's development.
I also have to form a synopsis for the report that I will be writing on the project in order to get my degree. I need to form a testable hypothesis, question or statement, state what methods I will use to test it and what literature I will reference. It is supposed to reflect what I have done on the project and my learning across the 2 years of school. I have no idea what to choose. Should I go with something producer-related or art? Perhaps something about working two separate roles? If I go with something about art, which part? I will not work on one single thing on the project, but will rather have to divide my attention on a great amount of vastly different tasks, including planning, character design and development, building a background story and world, designing UI and menus as well as logos and ordering t-shirts. It just seems so difficult to choose and I think no matter what part I choose it will not be something that I will spend all of the 8 weeks doing.
måndag 13 april 2015
Week 3
We ended last week with a team meeting where we discussed how the project had gone so far, focusing on last week. It was mostly the leads informing the other sections on the team on what our own section had done and how that correlates to the original planning and scheduling. All team members also had the chance to take up any issues that had occurred during the first two weeks.
One reason for having this meeting was that we had come to our internal deadline for the playable prototype. Since we already had something close to that within a few days of the project we felt that the planning and first two weeks had been a success. It was only, as mentioned in previous posts, in the art section that the artists seem to be slightly behind. We do however hope that the work we are doing now will decrease the time needed on texturing tremendously, which will put us back on schedule.
As today is Monday and the start of a new week, we had a weekly morning meeting where we went through what we need for the ALPHA (internal), which we have planned for in two weeks, and what of that is to be complete within this week. Our meeting structure is so that we have morning meetings daily, in those meetings all team members will one by one say what they will be doing that day as well as bring up any questions or problems that might be of interest of the entire team. The team is of course encourage to ask immediately whenever a problem or question occurs, programmers and artists answer to their respective leads which answer to the designer and the producer. On monday mornings we have a longer meeting where we go through the entire week's goals before discussing what all members are doing that day. Fridays we have another weekly meeting where we will discuss how it went with what we had planned, how far we have come and whatever problems occurred. At the end of each day, before leaving, I, as the producer, ask the team if there is anything they need to bring up or ask, if not it is left until the morning.
Mondays are also the days of meeting with teachers to check up on our progress, this meant that I spent the entire midmorning in meetings, first with the team, then in a producer meeting and finally in an artist meeting. In the producer meeting we discussed how far we have come with the project, if there were any hardware or programs that we might need as well as had a look at the project plan and design document. Everything seemed to be in order, all documents looking good and the teacher happy with the fact that the programmers are at this point 2-3 weeks ahead of schedule.
The art meeting felt a bit short, we did not have time to show everything and fully explain, I think it might have been to an advantage if the teachers had had a look at our vertical slice prior to the meeting. They did give us a lot of valuable help though, they confirmed our idea of experimenting with the placement of the camera to make visible the proportions of the characters. They also questioned the choice of letting the player direct the camera which means that everything must look good from 360 degrees. This is something that the designer is quite set upon though and is important to gameplay and we will only be doing one indoor environment so hopefully it will not be a problem.
They also advised us to think a lot about the colour palettes and perhaps split complementary colours. They suggested that we do mockups and slide around the HSB-meters in Photoshop and take screens and compare what looks best. Something that we have thought a lot about was also mentioned, that the colours of the main character must fit with all levels that we want to make.
I thought about adding something about my progress on the high-poly but this turned out so long that it will have to be short. Z-Brush seems to work for us although it is a challenge and takes some time. I still have quite a lot to do with it, for instance I have not yet started on the face, hair and armour pieces which makes me feel a bit stressed. I have though done the groundwork on the body, legs, hands and feet, although the latter two still need some attention. On the other parts it is mostly a matter of sharpening up the details which I will not do until the entire model is at that stage.

One reason for having this meeting was that we had come to our internal deadline for the playable prototype. Since we already had something close to that within a few days of the project we felt that the planning and first two weeks had been a success. It was only, as mentioned in previous posts, in the art section that the artists seem to be slightly behind. We do however hope that the work we are doing now will decrease the time needed on texturing tremendously, which will put us back on schedule.
 |
| Ingame Prototype as of Last Week |
As today is Monday and the start of a new week, we had a weekly morning meeting where we went through what we need for the ALPHA (internal), which we have planned for in two weeks, and what of that is to be complete within this week. Our meeting structure is so that we have morning meetings daily, in those meetings all team members will one by one say what they will be doing that day as well as bring up any questions or problems that might be of interest of the entire team. The team is of course encourage to ask immediately whenever a problem or question occurs, programmers and artists answer to their respective leads which answer to the designer and the producer. On monday mornings we have a longer meeting where we go through the entire week's goals before discussing what all members are doing that day. Fridays we have another weekly meeting where we will discuss how it went with what we had planned, how far we have come and whatever problems occurred. At the end of each day, before leaving, I, as the producer, ask the team if there is anything they need to bring up or ask, if not it is left until the morning.
Mondays are also the days of meeting with teachers to check up on our progress, this meant that I spent the entire midmorning in meetings, first with the team, then in a producer meeting and finally in an artist meeting. In the producer meeting we discussed how far we have come with the project, if there were any hardware or programs that we might need as well as had a look at the project plan and design document. Everything seemed to be in order, all documents looking good and the teacher happy with the fact that the programmers are at this point 2-3 weeks ahead of schedule.
 |
| Ingame Prototype as of Last Week |
The art meeting felt a bit short, we did not have time to show everything and fully explain, I think it might have been to an advantage if the teachers had had a look at our vertical slice prior to the meeting. They did give us a lot of valuable help though, they confirmed our idea of experimenting with the placement of the camera to make visible the proportions of the characters. They also questioned the choice of letting the player direct the camera which means that everything must look good from 360 degrees. This is something that the designer is quite set upon though and is important to gameplay and we will only be doing one indoor environment so hopefully it will not be a problem.
They also advised us to think a lot about the colour palettes and perhaps split complementary colours. They suggested that we do mockups and slide around the HSB-meters in Photoshop and take screens and compare what looks best. Something that we have thought a lot about was also mentioned, that the colours of the main character must fit with all levels that we want to make.
I thought about adding something about my progress on the high-poly but this turned out so long that it will have to be short. Z-Brush seems to work for us although it is a challenge and takes some time. I still have quite a lot to do with it, for instance I have not yet started on the face, hair and armour pieces which makes me feel a bit stressed. I have though done the groundwork on the body, legs, hands and feet, although the latter two still need some attention. On the other parts it is mostly a matter of sharpening up the details which I will not do until the entire model is at that stage.
onsdag 8 april 2015
Z-Brush
Yesterday I continued on the mesh of the main character in 3DS Max, at the end of the day I had reached the point that I was ready to take it into z-brush and have a go at it. I had blocked in all the armour pieces but decided to only export the body itself, leaving the armour for modeling separately at a later point so they are not in the way.
I managed to get far enough to export the mesh from Max and importing it as a tool in Z-Brush, that was when things started to get tricky. It is a program that I have never used before, but I managed to figure out how to move the camera around and enter edit mode before giving up for the night.

This morning I asked for a crash course from one of my fellow artists who is very familiar with the program, this allowed me to start sculpting although it did not work out exactly as I wanted. I do find the controls a bit clumsy and the tools a bit tricky to use, but I imagine that it might just be that it needs some time getting used to.
One of the things that I tried to work on was the leather corset, it has the very basic details although I could not manage to create the sharp edges that I want, everything just seems to smudge together. Perhaps I need higher resolution on the mesh, or perhaps I smoothed the character to much before. I think that smoothing her was not a bad idea though, as I needed to remove the very square shapes and form her body. Most likely it is just due to my inexperience with the tools, I hope I get the hang of it tomorrow.

I do think that it is a bit of a risk using a new software in a project that only takes place in such a short period of time. Had not one of the team members been experienced with the program I might have decided differently.
I will have to rethink parts of the schedule as this method slightly changes the pipeline, in a way I could say that the base meshes are complete and that I should add High-Poly cards for the assets to the SCRUM. At the moment we are only continuing on the base mesh cards, which does make it seem as if we are more behind schedule than we are as they are due this week. This means creating a low-polymesh for the final meshes but we will be able to use these models to create textures.
The reason for choosing to do it this way was that I believe it can have a big impact on the textures and, if we are lucky, help us out a lot with the textures later. I was very much inspired by a tutorial I found by an environmental artist's work on World of Warcraft and was very interested in trying out that method of texturing. Another reason was having discussed with my fellow artists, especially the environmental artist who felt that our artstyle would benefit from using Z-Brush and wanted to use it himself.
If we manage to control the program to a satisfactory level in a short time period I will think of it as successful, but we do have a plan B as well which is closer to the pipeline that we have followed in previous 3D-courses. This means doing all modeling in Max (base mesh to low-poly) and then handpainting all textures in Photoshop.
I managed to get far enough to export the mesh from Max and importing it as a tool in Z-Brush, that was when things started to get tricky. It is a program that I have never used before, but I managed to figure out how to move the camera around and enter edit mode before giving up for the night.
This morning I asked for a crash course from one of my fellow artists who is very familiar with the program, this allowed me to start sculpting although it did not work out exactly as I wanted. I do find the controls a bit clumsy and the tools a bit tricky to use, but I imagine that it might just be that it needs some time getting used to.
One of the things that I tried to work on was the leather corset, it has the very basic details although I could not manage to create the sharp edges that I want, everything just seems to smudge together. Perhaps I need higher resolution on the mesh, or perhaps I smoothed the character to much before. I think that smoothing her was not a bad idea though, as I needed to remove the very square shapes and form her body. Most likely it is just due to my inexperience with the tools, I hope I get the hang of it tomorrow.
I do think that it is a bit of a risk using a new software in a project that only takes place in such a short period of time. Had not one of the team members been experienced with the program I might have decided differently.
I will have to rethink parts of the schedule as this method slightly changes the pipeline, in a way I could say that the base meshes are complete and that I should add High-Poly cards for the assets to the SCRUM. At the moment we are only continuing on the base mesh cards, which does make it seem as if we are more behind schedule than we are as they are due this week. This means creating a low-polymesh for the final meshes but we will be able to use these models to create textures.
The reason for choosing to do it this way was that I believe it can have a big impact on the textures and, if we are lucky, help us out a lot with the textures later. I was very much inspired by a tutorial I found by an environmental artist's work on World of Warcraft and was very interested in trying out that method of texturing. Another reason was having discussed with my fellow artists, especially the environmental artist who felt that our artstyle would benefit from using Z-Brush and wanted to use it himself.
If we manage to control the program to a satisfactory level in a short time period I will think of it as successful, but we do have a plan B as well which is closer to the pipeline that we have followed in previous 3D-courses. This means doing all modeling in Max (base mesh to low-poly) and then handpainting all textures in Photoshop.
måndag 6 april 2015
Base Mesh
As I finished the turnaround for our main character last week and did a quick colouring during the weekend it was time to start working on the base mesh. It was originally supposed to be due today, but I rearranged the schedule slightly to accommodate for the increased time spent on the concept art. I did manage to get quite far though, and might get it done tomorrow if everything goes well. Today was quite laid back and the offices quite empty, since it is still Easter. Most of us made it down to the office anyway for another relaxed day of work, in spite of it being a holiday.
Before starting on the mesh I helped a sick team member out by making some last adjustments to the turnaround of the antagonist. There was mainly an issue of the pose being to straight and stiff, also some parts were lacking a bit of thickness. As we need to get started on the mesh I decided to not clean it up to perfection. I got the basics down and any details will have to get addressed during the modeling, we do not have any more time to spend on it at this point.
I also did some producer tasks, which meant adding all of the environment assets to our scrum now that the concept art for the level is done. We have waited until that to add the items to the list so that we would know exactly what we need. I still need to add deadlines for them, which I might get done tonight.
I started out the modeling by creating planes on which I projected the four different angles from the turnaround (front, back, left, right). Then I created a box, starting on the clavicles on the shoulders, ending by the armpit. From there I used extrusion to create, first the body, and then from the body arm, leg and finally neck and head.
When I had the very first basic shapes, I started adding some loops across the body to get the general shapes, adding more as I went and moving on onto moving vertices and lines. I spent most of the time on fine tuning on the lower part of the leg and foot as that was where the biggest problems were. At the end of the day the leg started to look better but I still need to do a lot of adjustments.
The next step will be to adjust the body, arm, and finally, the booty, as it can be a tricky area I want to save it until the other shapes are starting to look complete. I am thinking of trying to create a highpoly in z-brush once I have the base mesh down, I have only ever opened the program once though, so I will have to see how that will turn out.
 |
| Coloured version of Tamarrion |
Before starting on the mesh I helped a sick team member out by making some last adjustments to the turnaround of the antagonist. There was mainly an issue of the pose being to straight and stiff, also some parts were lacking a bit of thickness. As we need to get started on the mesh I decided to not clean it up to perfection. I got the basics down and any details will have to get addressed during the modeling, we do not have any more time to spend on it at this point.
I also did some producer tasks, which meant adding all of the environment assets to our scrum now that the concept art for the level is done. We have waited until that to add the items to the list so that we would know exactly what we need. I still need to add deadlines for them, which I might get done tonight.
I started out the modeling by creating planes on which I projected the four different angles from the turnaround (front, back, left, right). Then I created a box, starting on the clavicles on the shoulders, ending by the armpit. From there I used extrusion to create, first the body, and then from the body arm, leg and finally neck and head.
 |
| Very first basic mesh |
When I had the very first basic shapes, I started adding some loops across the body to get the general shapes, adding more as I went and moving on onto moving vertices and lines. I spent most of the time on fine tuning on the lower part of the leg and foot as that was where the biggest problems were. At the end of the day the leg started to look better but I still need to do a lot of adjustments.
 |
| Base Mesh at end of day |
The next step will be to adjust the body, arm, and finally, the booty, as it can be a tricky area I want to save it until the other shapes are starting to look complete. I am thinking of trying to create a highpoly in z-brush once I have the base mesh down, I have only ever opened the program once though, so I will have to see how that will turn out.
fredag 3 april 2015
Week 1
The first week of production has now come to an end. Some of us met up for a voluntary day of casual work in the office, because of it being a holiday it was very relaxed and we had a few visitors come by to hang out and look at what we are doing.
Although it could still do with some additional cleaning I finished the turnaround of the main character today. Mostly I have just cleaned up the lines a bit to make it easier to see when it is time to model, I do not feel at this point that it is worth the time to clean it further, it would only be for promotional purposes that it might be necessary. When I was done with the turnaround I started testing out some colouring but I will need to continue with that during the weekend.

It does concern me a bit that we are not further along with the concepts, I would have wanted to start modeling this week, and we still have to do concepts for the weapons. I think that we will have to step up the pace a bit next week, this first one has been somewhat of a trial, learning to work together as a team. Another reason for falling a bit behind is probably because we have only had three full days of work this week and for me personally that I have had other tasks that comes with being producer, such as project plan and answering questions/giving feedback.
The concept art for the level is pretty much done though and the artist has started working on details which will be very important for the level. All that needs to be done there is to add the list of items needed into the backlog and perhaps look a bit at the colourscheme so we can coordinate it with the characters.
The boss character is also coming along although there are still some issues with it, I do believe that it will be finished during the weekend which means that we will have to do some real quick decisions on colours on Monday.
The programmers seem to be doing well on their schedule, unity seems to be making things easy for them and they have a functional camera, a character which you can control and an attackable character with a basic UI displaying stats. All UI elements and inventory are scheduled to be completed not until the end of the project as the gameplay is more important. After some discussion between designer and coders it was decided that they would create a very basic one at this point to aid the designer in his work. Things does not always go as intended though and when one of our coders was testing attacking, which he had been working on today, he found that something strange had happened. :)

This would be the most OP boss ever, attack him and he multiplies!
I hope that laying down the foundations of the project, having done a lot of planning and organisational work will give me a lot more time to produce art which I believe is necessary for us to finish. I do have a lot of faith in my team though, they are very talented, easy to work with and so far we seem to get along well.
Although it could still do with some additional cleaning I finished the turnaround of the main character today. Mostly I have just cleaned up the lines a bit to make it easier to see when it is time to model, I do not feel at this point that it is worth the time to clean it further, it would only be for promotional purposes that it might be necessary. When I was done with the turnaround I started testing out some colouring but I will need to continue with that during the weekend.
It does concern me a bit that we are not further along with the concepts, I would have wanted to start modeling this week, and we still have to do concepts for the weapons. I think that we will have to step up the pace a bit next week, this first one has been somewhat of a trial, learning to work together as a team. Another reason for falling a bit behind is probably because we have only had three full days of work this week and for me personally that I have had other tasks that comes with being producer, such as project plan and answering questions/giving feedback.
The concept art for the level is pretty much done though and the artist has started working on details which will be very important for the level. All that needs to be done there is to add the list of items needed into the backlog and perhaps look a bit at the colourscheme so we can coordinate it with the characters.
The boss character is also coming along although there are still some issues with it, I do believe that it will be finished during the weekend which means that we will have to do some real quick decisions on colours on Monday.
The programmers seem to be doing well on their schedule, unity seems to be making things easy for them and they have a functional camera, a character which you can control and an attackable character with a basic UI displaying stats. All UI elements and inventory are scheduled to be completed not until the end of the project as the gameplay is more important. After some discussion between designer and coders it was decided that they would create a very basic one at this point to aid the designer in his work. Things does not always go as intended though and when one of our coders was testing attacking, which he had been working on today, he found that something strange had happened. :)
This would be the most OP boss ever, attack him and he multiplies!
I hope that laying down the foundations of the project, having done a lot of planning and organisational work will give me a lot more time to produce art which I believe is necessary for us to finish. I do have a lot of faith in my team though, they are very talented, easy to work with and so far we seem to get along well.
Prenumerera på:
Inlägg (Atom)