
As I had already created a base mesh that I used to create the high-poly in z-brush I used that as a base for my low-poly, adjusting it on top of the high-poly. The boots showed me the same problem that I previously had with the pants, which was to create the creases. It turned out to be far trickier than I first thought as I want to use the typology that I have rather than just adding more and more polys. As she will be animated I also ave to consider the edgeflow so that there will be no strange deformations. I tried solving the problem by creating the main shapes of the folds, including the breaks in silhouette while leaving all details to maps. Perhaps there are still things that can be improved both on the boots and legs but I believe that it will work as it is now.

Another problematic area were the hands. The typology was initially pretty much chaos. I looked for references on hand typology that I used to get a better idea of how the edgeflow should be. For this I had some help from one of my team mates that had faced the same problems in the previous course. Again, it could probably be improved but it looks ok and hopefully it will work as her hands are an essential part of the game, being used both to hold her weapon and to cast spells. Here I believe I have some advantage as her glove will be quite dark which will help to hide errors.

In opposite of what I have done with her body and boots I decided not to use the head of the base mesh, instead I deleted it and started from scratch from planes. The reasoning behind this was to create a functional edge flow. When creating the base mesh I only focused on getting the silhouette fast so that I could get started with z-brush, with little thought of the typology.
 |
| Planning turned out a lot harder than planned. |
The face did prove to be a challenge but in the end I think that the edge flow came out ok, although it is not perfect. The first thing I did was to open a close up of her face in Photoshop, trying to think of approximately how to place the edgeflow. I drew on top of it to get a general idea and remember how it should look. I also took some time to find some examples among the tutorials we have been suggested in previous 3D courses.
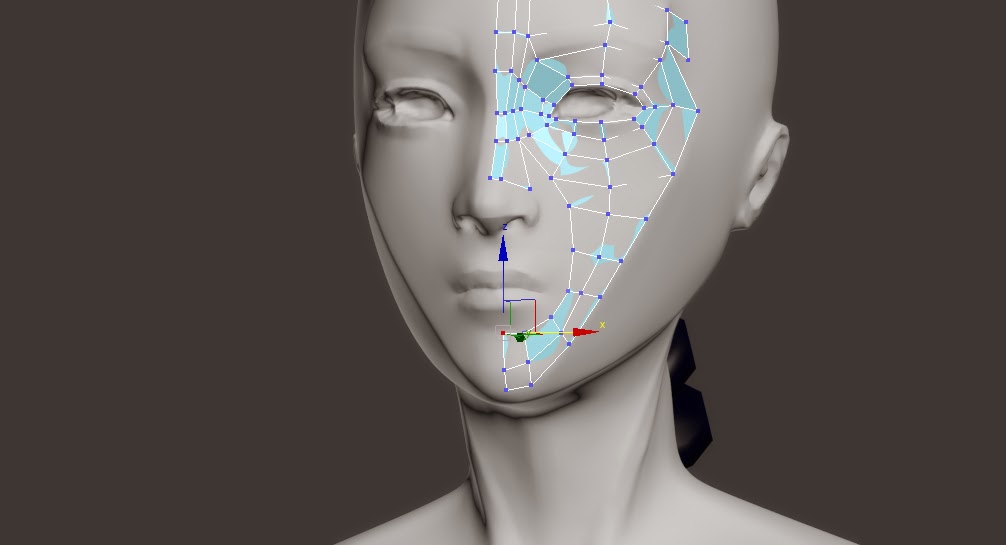
I started the modeling with a single plane on the edge of her upper eyelid and extruding it to the sides to circle the eye, all the while making sure that the loops matched vertically and that I had the same amount of polys on both eyelids. From there I continued circling her eye, moving towards the nose and cheek, this is where the problems started to line up with starshapes and triangles while trying to follow the shape of her face. I did have to stop and think several times to think of how to continue and where the loops should go.
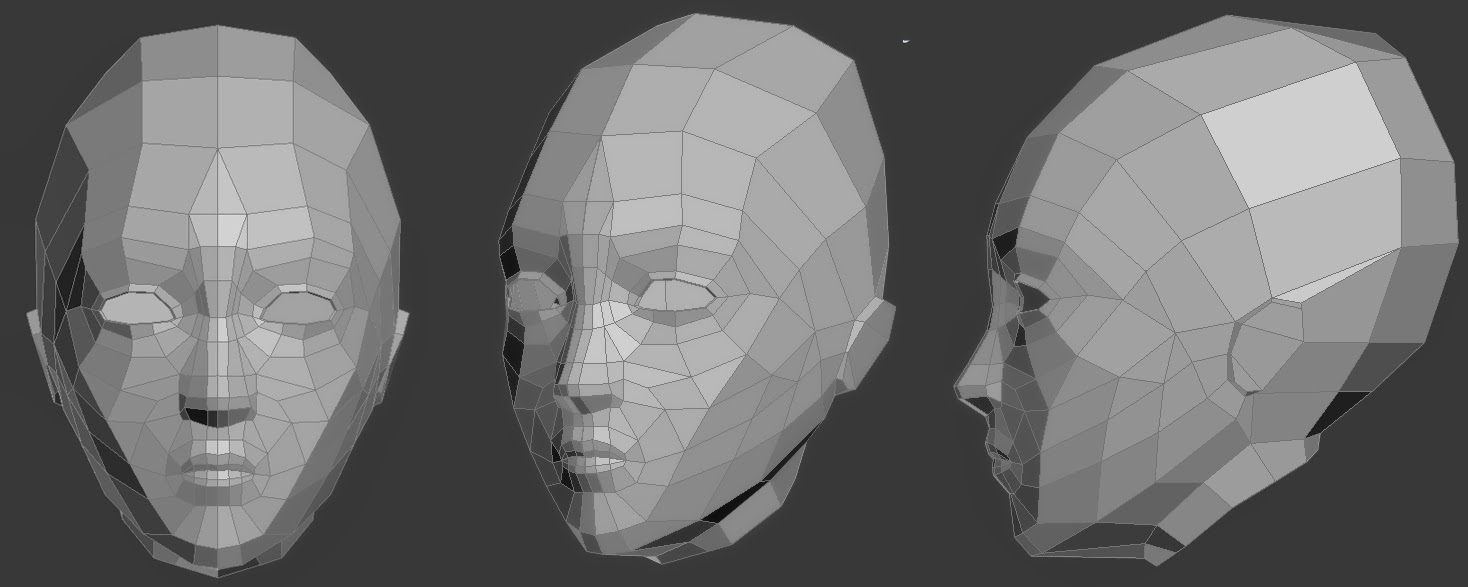
Since the character will mostly be seen from the back I did not want to spend too many polygons on the face. I did however want the face to still look good as it might be useful for later stages. Perhaps if we decide that we want to continue working on the game we might want to add things where she will be seen from the front. We might also want to have her visible in the inventory menu, so that the player can actually see the character that they are playing as. If we need to make adjustments to the camera her face might also be visible more often, the way it is now it will be occasionally when turning. Another reason is promotional material, while creating cinematics and trailers we will very likely want to show her face. For these reasons I have also added bones to her face to accommodate for facial animations although I deem it very unlikely to be entered into the vertical slice that we are developing now.
When the hair is complete and I want to start assembling all the pieces of her together I will probably delete some of the polygons that now forms her head as they will not be necessary. At this point we just want the low-poly to be complete as soon as possible so the coders get something to work with, this means that she will be bald for a while. As I still need to do a high-poly for it I decided to complete the most necessary parts of the low-poly so that it can be tested inside the game as all other parts can just be added to it since the rig is already complete and waiting for them.

The rig is one of the things that I continued working on today as we wanted to get the pretty much finished low-poly into the engine to test. It was done for the base mesh so it needed some small adjustments to hands and ankles as well as the braid which I did as a "tail" rather than just regular bones. I also added weapon attachments to both her hands as I had forgotten to do that previously and bones for her face. I still need to add weapon attachment bones to her hip and perhaps her back so that she will be able to sheathe her blade. I am just now starting to think that maybe I should add a bone to her left arm so that we will be able to give her a shield, should we decide to continue with the game. I realize how important to get the rig right at this point, because once it is done and animations are applied to it, it cannot be changed, at the risk of having to redo all animations. Therefore I think it important to accommodate for all possibilities that we might want to add now, even though we might not need it right away.


I also worked on the hair today, yesterday I made tiny adjustments to the top part of the braid to make it a bit bore asymetrical. today I started trying to figure out how to create the hair. Up until now I have created a "helmet" so that I would have some thickness and volume to work with in z-brush. I am however very uncertain of how to continue on from here, much because I have never modeled hair before. I have very limited knowledge of where to even start. I am thinking that maybe I should create a high-poly in z-brush with what I have now and then create it from planes based on that. It could probably work to keep what I have though, so that I can keep the volume, as having it as just one piece works with the art style that we have chosen and add perhaps one plane on each side for the bangs and maybe another to break up the silhouette. I had a look at World of Warcraft models and they seem to model the hair as one piece (ponytails) and add a few planes, I may not have the skills that the people working there just yet but I think I could try to create something similar.

There are still so many things to be said but this is getting extremely long and my hands are starting to hurt from typing so I will just have to continue working on the model and discuss my problems another time.
Inga kommentarer:
Skicka en kommentar